Practical tips for the layout of application forms in Lathe
Some helpful techniques for lovers of Latex and wanting to impose the form of some statements. We for example to impose a claim form to Mail of Russia (its "official" option, if you are lucky, download from the website of the Russian post). The entire layout from the first to the last letter will not explain, assuming that the reader with the basics of Lateja sign. Consider a specific recipe layout "lines" where you have to enter the missing words, checkboxes with labels, labels in small print on the bottom of the text and lines of different thickness and discontinuity.
Of course, the recipes are not the only possible, and certainly something so wrong. If you know how to cook better, you are welcome in the comments.
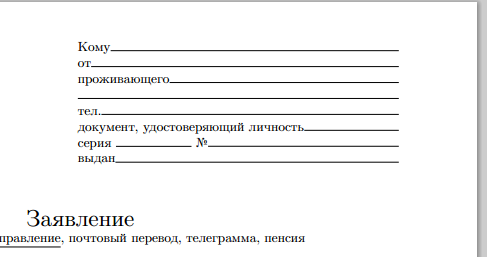
As a rule, all statements begin with a few lines in the top right corner, which fits into the receiver and the applicant. This unit needs to be pressed to the right in the block left aligned and in each row there are usually a few words at the beginning, followed the line to the end. Sometimes in the middle of the line, too, are words.
The simplest code that makes what you want, looks like this:
the
We made some modifications to the environment
the
you can use it like this:
the
To circle something the frame can be a macro
the
Place the squares on the page using a table:
the
To make underlined text is easy, but how to make the "overline", for example, to write in small print "last Name" under field name? One way is to use the macro
the

Finally, there are often lines on the entire page. In the example, you will have a dotted line that separates your coupon, and sometimes in statements or complaints lines separate "special" hat from the rest of the text (as, for example, the letter in the picture on the right). Intermittent line can be done using the macro
the
Solid lines can be done with the command
the
but the distance between them is too large. You can play with the shift lines, but it's easier to use the commands
the
The finished form can be downloaded here, and updated the source code to see here
Article based on information from habrahabr.ru
Of course, the recipes are not the only possible, and certainly something so wrong. If you know how to cook better, you are welcome in the comments.
the Recipient of the statement
As a rule, all statements begin with a few lines in the top right corner, which fits into the receiver and the applicant. This unit needs to be pressed to the right in the block left aligned and in each row there are usually a few words at the beginning, followed the line to the end. Sometimes in the middle of the line, too, are words.
The simplest code that makes what you want, looks like this:
the
\begin{flushright} % moves the contents of the environment right
\begin{tabular}{p{.5\textwidth}} % make the table one column wide, half of the text
Who \hrulefill \\ % \hrulefill make the line to end of line
from \hrulefill
\end{tabular}
\end{flushright}
We made some modifications to the environment
flushright, tabular and a macro \hrulefill are inserted automatically. We define a new environment lines:the
\newenvironment{lines}[1][\textwidth] % the default line for the entire width of the text
{
\newcolumntype{E}{>{}p{#1}<{\hrulefill}} % at the end of our column will be attributed to the \hrulefill
\begin{flushright} % automatically insert flushright
\begin{tabular}[h]{E} % tabular format
}
{\end{tabular}\end{flushright}
}
you can use it like this:
the
\begin{lines}[.5\textwidth]
Who \\
from\\
living\\
\\
tel.\\
the document proving the identity\\
series \rule{2cm}{0.25 pt} n \\ % \rule make a line of specified length and thickness
issued
\end{lines}
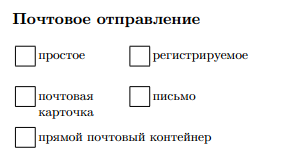
tick boxes
To circle something the frame can be a macro
\fbox, but how to make the empty case desired size, say 3 mm? Certainly a lot of ways. You can use the environment minipage, which allows you to specify the width and height: \begin{minipage}[c][0.3 cm]{0.3 cm}\quad\end{minipage}, can low-level commands \vbox and \hbox: \vbox to 3mm {\vfil \hbox to 3mm{} \vfil}. In any case, to write so much every time the code does not want, so let's make a new command \chkbox and will give her argument the text that should be placed next to the checkbox.the
% \: make a space between the box and the text
% and \parbox will make the paragraph the desired width to the text you can use line breaks
% do not forget to include the calc package for arithmetic operations with lengths
\newcommand\chkbox[1]{\fbox{\begin{minipage}[c][0.3 cm]{0.3 cm}\quad\end{minipage}}\:\parbox[t]{\linewidth - 0.3 cm}{#1}
}
Place the squares on the page using a table:
the
\begin{tabular}{p{.17\textwidth}p{.25\textwidth}p{.25\textwidth}p{.3\textwidth}} % adjust column width to taste
\chkbox{air} & \chkbox{notification\\ presentation} & \chkbox{cash} &\parbox[t]{.3\textwidth}{amount imposed\\ payment \hrulefill} \\
\end{tabular}
Text under the line
To make underlined text is easy, but how to make the "overline", for example, to write in small print "last Name" under field name? One way is to use the macro
\underset of package amsmath:the
% text "position, surname and signature of the person" under the empty line width in columns
Line
Finally, there are often lines on the entire page. In the example, you will have a dotted line that separates your coupon, and sometimes in statements or complaints lines separate "special" hat from the rest of the text (as, for example, the letter in the picture on the right). Intermittent line can be done using the macro
\hdashrule of package dashrule:the
% the line width of all thickness of 1 item omitted 2 millimeters relative to the baseline
% the template "bar 3 mm space 1 mm"
\hdashrule[-2mm]{\textwidth}{1pt}{3mm 1mm}
Solid lines can be done with the command
\rule, which has the same syntax, except for the lack of the last argument (the template line). Two solid lines of different thickness easy to do:the
\rule{\textwidth}{.5mm}
\rule{\textwidth}{.25mm}
but the distance between them is too large. You can play with the shift lines, but it's easier to use the commands
\hrule and setting the kerningthe
\hrule height 1pt\kern 2pt \hrule height 0.25 pt
All together
The finished form can be downloaded here, and updated the source code to see here


Комментарии
Отправить комментарий